

Tout droit sortie des boules à mites, voici un
Tout droit sortie des boules à mites, voici un ancien kit qui reprends des plumes...
Quand j'ai crée ce kit, je pensais à toutes les petites filles qui n'aiment pas nécessairement jouer aux poupées. Et il ne faut pas oublier les petits garçons qui délaissent les petites autos... Personnellement, mon fils, à 5 ans, voulait à tout prix une bicyclette rose ! Aujourd'hui, à 18 ans, c'est une toute autre histoire mais pourquoi ne pas laisser tomber les stéréotypes et faire plaisir à nos enfants quand c'est le temps... Alors je vous représente mon kit
GIRLS LIKE BOY TOY TOO
Straigt out of mothballs, here is a kit that old resume feathers...
When I created this kit, I thought of all the girls who do not necessarily play with dolls. And don't forget the boys who leave small cars... Personnaly, my son, 5 yeard old, wanted at any price pink bicyle! Today, at 18, is a different story but why not drop the stereotypes and pleasure to our children when it is time...
So I show you my kit again
GIRLS LIKE BOY TOY TOO


Lorsque nous créons des fond d'écran avec un empillage de papiers et d'éléments divers, nous utilisons souvent les jeux d'ombres pour donner l'impression que les objets s'entremêlent. Il est facile de rajouter une ombre pour donner l'impression qu'un élément est plus haut que les autres ou plus loin du papier que le reste... mais il est un peu plus difficile de faire en sorte qu'un objet passe à la fois par-dessus et en dessous d'un même item. Voici un petit truc pour vous aider à recréer cette impression.
Bien sûr, il y a plusieurs façons d'arriver au même résultats... Par contre, je trouve que ce truc est un des meilleurs car il permet un bon contrôle des ombres .
voici maintenant un exemple
When we create bottom of screen with an stacked papers and diverse elements, we often use the sets of shadows to give the impression that objects become entangled. It is easy to add a shadow to give the impression that an element is higher than the others or farther some paper which the rest but it is a little more difficult to make so that an object passes at the same time over and below the same item. Here is a small tip to help you to recreate this impression.
Of course, there are several manners to arrive in same results... On the other hand, I find that this tip is one of better because he allows a good control of the shadows.
Here an example
|
|
Vous voyez ici que la fleur passe devant et derrière l'étiquette et le cordage passe à travers les barreaux de l'échelle. Comment faire pour que tout cela ait l'air réel, en 3D sans coupure ni bavure ? Ce tutoriel est fait à partir de Paint Shop Pro mais les indications sont les mêmes pour n'importe quel logiciels.
You see here that the flower passes in front and behind the label and the rope gets through the bars of the ladder. How is that all this look real, in 3D without cut or smudge? This tutoriel is made from Paint Shop Pro but the indications are the same for whatever software. |
|
Voici maintenant les deux images que je vais traiter de front pour faire ce petit tutoriel. Prenez donc les 2 objets que vous voulez pour votre dessus-dessous.
While maintaining both images which I am going to treat to make this little tutoriel. Thus take 2 objects which you want for your top-bottom.
|
|
|
|
|
|
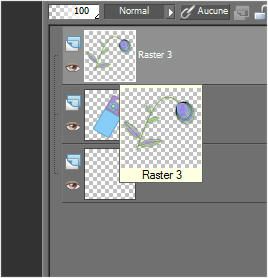
Chaque élément étant sur un calque séparé. Vous devez copier le calque de l'objet qui passera par dessus. Every element being on a separate copy. You have to copy the layer of the object which will pass by top.
|
|
|
|
|
|
Ensuite, vous déplacer un des deux calques sous l'objet qui restera au centre. Then, to move you one of both copies under the object which will stay in the center |
|
|
|
|
|
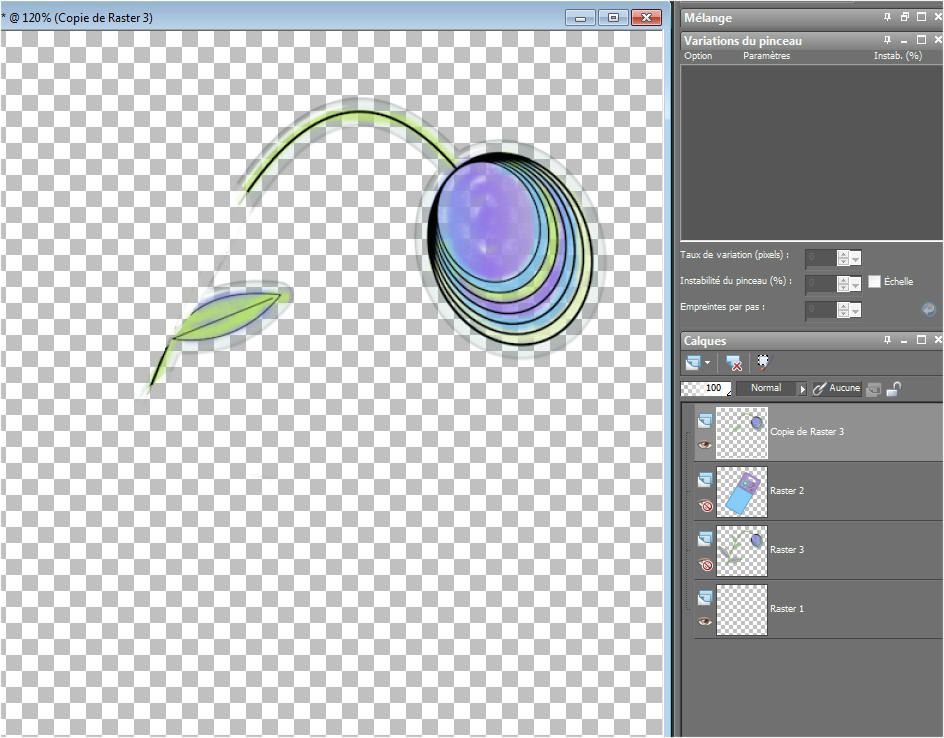
Maintenant vous utilisez votre efface et délicatement, vous enlevez les parties que vous ne voulez pas voir par-dessus l'objet médian. Dans la 2ième image, j'ai mis mes autres calques en invisibles pour que vous voyez un peu ce que j'ai effacer... J'en ai enlever ici un peu plus car mon objet est transparent et donc, en laissant la partie supérieure, cela rend ma tige moins opaque. Mais sinon, vous pouvez tout simplement effacer que la partie qui passe par-dessus l'objet médian et ce sera très bien. Now you use your erase and delicately, you remove the parts which you do not want to see over the median object. In the 2nd image, I put my other copies in invisible so that you see a little what I have to erase... I have it to remove here a little more because my object is transparent and thus, by leaving the top, it returns my less opaque stalk. But otherwise, you can simply erase that the part which passes over the median object and it will be very well.
|
|
|
|
|
|
|
|
|
|
Vous pouvez voir ici l'exemple avec l'échelle et la corde. J'ai encore une fois mis le calque inférieur invisible pour que vous constatiez ce que j'ai effacer de l'objet supérieur. Vous pouvez voir aussi que j'ai encore une fois effacer un peu plus que seulement ce qui passe par-dessus les barreaux... C'est tout simplement pour mieux travailler les ombres et donner un effet plus réaliste à la fin. You can see here the example with the ladder and the rope. I once again put the invisible lower copy so that you noticed what I have to erase of the upper object. You can see as well as I have once again to erase a little more that only what passes over bars... It is simply to work better the shadows and give a more realistic effect at the end.
|
|
|
|
|
|
Maintenant, une des étapes les plus importantes, l'ajout de l'ombre. Vous devez choisir de rajouter l'ombre sur un autre calque !!!! Car vous devrez faire de petits ajustements. En effet vous devrez aussi effacer un peu d'ombre car vous aurez de beaux tranchants noir inesthétiques. Now, one of the most important stages, the addition of the shadow. You have to choose to add the shade on another copy!!!! Because you will have to make small adjustments. Indeed you will also have to erase a little of shade because you will have beautiful sharp edges black unsightly.
|
|
|
|
|
|
On voit mieux ici de quoi je parle. Vous ajoutez l'ombre sur les deux objets (supérieur et inférieur), mais comme celui supérieur à été effacer en partie, vous aurez aussi une ombre partielle de l'objet qui viendra par-dessus l'objet inférieur. Vous devez donc faire de petits coups d'efface sur ces portions d'ombre. Petit truc gagnant : j'utilise aussi mon outil adoucisseur de contour pour y aller en progression... cela rend l'ombre beaucoup plus naturelle et surtout en ayant à l'esprit que l'ombre qui passe sous les barreaux ( ou autres objets ) est moins prononcée.
We see better here about what I speak. You add the shade on both objects (upper and lower), but as that upper was erase partially, you will also have a partial shade of the object which will come over the lower object. You thus have to make small knocks of erase on these portions of shade. Small winning tip: I also use my tool softener of outline to go to progress there it returns the much more natural shade and especially by having in mind that the shade which passes under bars (or the other objects) is less pronounced. |
|
Aussi... assez important... ce genre de manipulation est beaucoup plus facile avec deux éléments sans ombre au départ. Vous pouvez voir dans l'image de l'échelle que le résultat est beaucoup moins doux que celui avec la fleur. So rather important this kind of manipulation is much easier with two elements without shade at first. You can see in the image of the ladder that the result is much less soft than that with the flower. |
|
|
|
|


J'espère que ce petit tutoriel vous aurez aider à améliorer vos pages ou vos créations.
I hope that this tutoriel young you will have help to improve your pages or your creations.
Voici deux nouvelles pages que j'ai faites à partir de mon kit / Here are two new pages which I made from my kit


et voici un petit cadeau pour vous
and a little gift for you...


/https%3A%2F%2Fstorage.canalblog.com%2F45%2F13%2F274738%2F63643874.gif)
/http%3A%2F%2Fscrapwithfriends.com%2Fbmz_cache%2F2%2F2999bac08d1585ca928d4f3241681415.image.600x600.jpg)
/https%3A%2F%2Fstorage.canalblog.com%2F32%2F56%2F274738%2F80562611_o.gif)